Azure IOT Configuration

 Step-by-Step Guide to Connecting a Simulated Device to Azure IoT Hub

This guide will walk you through the process of setting up a simulated device, configuring an Azure IoT Hub, and connecting the two to test data transmission.

Prerequisites:

 * An active Azure subscription.

 * A computer with internet access.

Step 1: Set up the Simulated Device

 * Find the Simulator: Locate a web-based Raspberry Pi temperature device simulator online. This will serve as your virtual device.

Raspberry Simulator link : https://learn.microsoft.com/en-us/azure/iot-hub/raspberry-pi-get-started

 * Access the Simulator: Open the simulator in your web browser. You will need to copy the connection string from Azure into its configuration later.

Step 2: Install and Configure Azure IoT Tools

 * Install Azure IoT Explorer: Download and install the Azure IoT Explorer application on your computer. This tool allows you to interact with your IoT Hub and devices.

 * Access Azure Cloud Shell: You have two options for using the Cloud Shell:

   * From the Azure Portal: Log in to the Azure Portal and click the Cloud Shell icon in the top right corner.

   * Install Locally: Install the Azure CLI on your computer and configure it to connect to your Azure account.

Step 3: Create and Configure Your IoT Device in Azure

 * Create an IoT Hub: If you don't already have one, create a new Azure IoT Hub in your subscription.

 * Create a New Device:

   * Using either the Azure Portal, Azure IoT Explorer, or Cloud Shell, create a new device within your IoT Hub. Give it a descriptive name (e.g., my-raspi-simulator).

   * Note: You may need to create a new device identity group first if your project requires it.

 * Retrieve the Connection String:

   * Once the device is created, navigate to its settings.

   * Find the device's primary connection string. This string contains the information needed for your device to securely connect to the IoT Hub.

   * Copy this connection string to your clipboard.

Step 4: Connect and Test the Simulation

 * Configure the Simulator: Go back to the web-based Raspberry Pi temperature simulator you opened in Step 1.

 * Paste the Connection String: Paste the connection string you copied from Azure into the designated field in the simulator's code or configuration.

 * Run the Simulation: Start the simulator. It should now begin sending simulated temperature data to your Azure IoT Hub.

 * Verify Data Transmission:

   * Use Azure IoT Explorer to connect to your IoT Hub.

   * Open the "Telemetry" view for your device.

   * You should see the temperature data being received from the simulator in real-time. This confirms a successful connection and data flow.

https://youtu.be/Sxj3QqYEbFQ


Playing own mp3 audio files in an Alexa skill using SSML


Telegram shell bot

 If you use Telegram regularly, you’ve probably heard of bots. They’re like regular accounts, you can talk to them or have them in groups and they’ll do all sorts of useful things for you.

In this post, I present you the shell bot! Unlike other bots, this one is self-hosted: you use it by running your own instance of the bot in your server.

This handy bot runs commands on demand and sends the live output, allowing you to interact at any time. It can even run graphical apps!

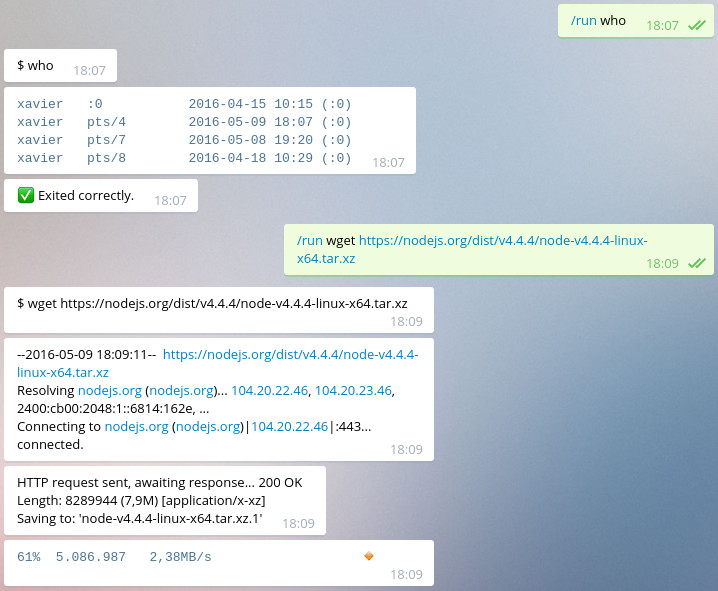
The shell bot running some simple commands.

It was made as an example for the botgram framework, but I’ve been using it for some time and it’s proven to be very useful. When you’re on mobile and just want to issue a few commands, talking to a bot is probably more convenient than opening an SSH app and connecting to the server.

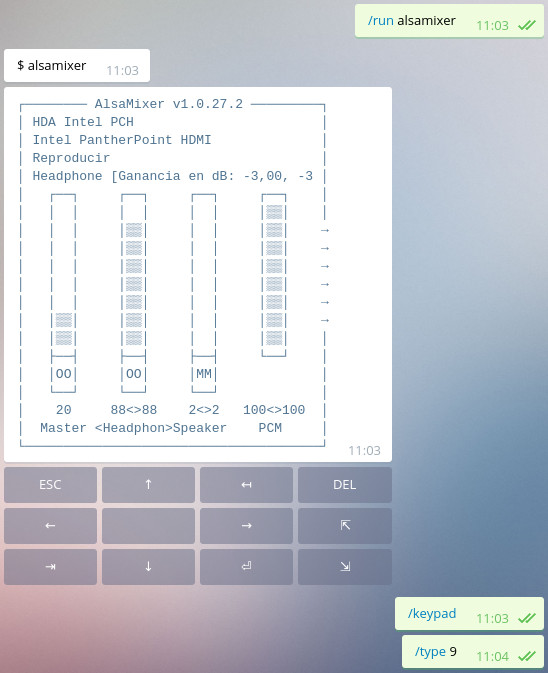
Graphical application example, alsamixer in this case.

It has creative uses as well: I once was troubleshooting a server problem with some friends, so we added the bot to the group and started playing around. Everyone could see what was going on, and suggest possible causes or things to try.

If you want to have your own shell bot, this post will guide you through the process of creating the Telegram bot itself, and installing the necessary software.

Create your bot

First of all, you need to register a Telegram bot. Don’t worry, it only takes some seconds. Click here to talk to the BotFather, then say /newbot and you’ll be asked some things (name, username, etc.). At the end, you’ll be given an authentication token that looks like the following:

123456:ABC-DEF1234ghIkl-zyx57W2v1u123ew11

Preparations

Edit: The bot now lives in its own repository and the installation process has been simplified. If you followed a previous version of this post, remove it and follow these steps from the start.

The following should be done on the computer you want to run commands on. First of all, make sure you have Node.JS installed (you can verify by running npm -v). You’ll also need a working compiler and git:

sudo apt-get install build-essential git

Clone the project and install dependencies:

git clone https://github.com/botgram/shell-bot.git
cd shell-bot
npm install

Then run the bot for the first time, to create the configuration file:

node server

It will ask you a set of questions, including the auth token that you got from the BotFather, and will ask that you talk to your bot (so it can know who his owner is).

Run it!

Now that we have everything set up, we can run the shell bot:

node server

Try saying /run uname -a for example, or say /help to learn about the available commands.

Autostart

Once you’ve played around, you may want the bot to start automatically on boot, and respawn if it crashes. For that, let’s install forever:

sudo npm install -g forever

Then, from your /etc/rc.local or an init script, call:

forever start /path/to/shell-bot/server.js

Also, it’s a good idea to talk to the BotFather and say /setcommands to define a list of commands your bot accepts. You’ll find this list in commands.txt; just paste the contents when asked. You may also want to change the bot’s profile photo and description.

Android Head Unit - Root Device / Model : evb3561sv_w_65_m0


Android Head Unit (evb3561sv_w_65_m0(full_evb3561sv_w_65_m0) or evb3561sv_w_65_m0 or TS356XKUDO

Build ID: MRA58K

CPU Info or SOC: Cortex ARM Cortex A-53 1.25 GHz ( 4 CPU or 4 Core)
Model : evb3561sv_w_65_m0(full_evb3561sv_w_65_m0)
Manufacturer : alps
Hardware : mt3561
Build ID : YT3518C_00008_V008
Android Version : 6.0
API Level : 23
Kernel Arch : aarch64
Source – Android APP CPU-Z (Google Play Store)
Cabling ( Turn On Unit without Car or Open Setup)

Inside Unit:


Panel Back Side


Top View


Rear view with USB ADB Port


Power Up Board (Cabling )

  1. Yellow ( Battery +12 V)
  2. Black ( Battery -12 V)
  3. Red (Next to Yellow – ACC [Sort red and yellow , ignition key ON])

Try without open Board Setup , connect to any USB Port and Change USB Configuration to Audio Source.
  1. Open ADB Tools And Location in CMD (Command Prompt – Admin Rights )  
  2. Check any of the Android Device (Android Phone ) connect to PC.
  3. Type Adb Devices 
  4. You can find root Shell in above image (command Adb Shell)    
  5. Download important tools to install SU (Super User) , because SU not  available in device.                                                                Install Terminal Emulator from Play Store.
Download arm64.zip and extract files to /sdcard/


Type Following Commands After Connecting to ADB Shell
1.        mount -o remount,rw /system
2.        cp /sdcard/arm64/su /system/bin/su
3.        chmod 0755 /system/bin/su
4.        cp /sdcard/arm64/su /system/xbin/su
5.        chmod 0755 /system/xbin/su
6.        su --install
7.        su --daemon&
8.        setenforce 0
9.        mount -o remount,ro /system


Note :
1.        Chose this option after enabling Developer option in device
2.        Select USB Configuration
3.        Select Audio Source
4.        Then Check in Command Prompt (type `adb device`) 

Device Cable Specification 


FAQ: Tools Tips
  1. ü  The password for the hardware settings menu is 8888 (Car Setting> Factory Setting.
  2. ü  Screen calibration: Press with five fingers, then follow the signs, the next step is to configure the touch buttons.
  3. ü  Engineering menu on the phone * # * # 3646633 # * # *
  4. ü  Switch the GU to ADB mode, dial * # * # 5678 # on the phone and select the device type device


Important Links for reference:


Wires : universal iso connector
Car Stereo Wiring Harness

(Update Android head unit with three reset)