 In this post I suggest a way to have an encrypted Linux installation
on a USB key, which to me is useful when I travel and I want to securely
access the functionality that desktop Linux offers. I want to have no
fear that what I take with me will be stolen, even if what I take with
me is a full Linux OS, together with my data and maybe some online
passwords saved in the browser.
The usage scenario is having a PC/laptop available, inserting my USB
key, turn on the PC booting from USB, insert password and access my
Linux OS. The PC can be my own laptop, or even a PC that I don’t own,
provided that it can boot from USB.
From a security point of view it is possible that if I insert my USB
key in a PC that I don’t trust, it can do a tamper/keylog/dump attack.
However, unless I am carrying military-grade secrets (and I’m not), it
is unreasonable to be afraid that someone tampered the BIOS/hardware of
any computer available in my travels.
I also wanted to give my USB key the traditional functionality of
working as a drive in Windows. There are a couple of things to consider:
- Windows can read FAT and NTFS partitions.
- Windows can read only the first partition of an USB flash drive (quite the WTF here).
It is possible that when you insert the USB key in a running Windows
environment a malicious software can dump an image of the flash drive
encrypted data, tamper the bootloader and insert a keylogger that sends
your password to the same entity that can access the dumped image.
Again, I don’t think this specific attack is realistic when you are just
carrying your personal data around.
While the Windows partition is unencrypted, some portable software can be used to save encrypted data, for example FreeOTFE, TrueCrypt or even 7zip.
While the Windows partition is unencrypted, some portable software can be used to save encrypted data, for example FreeOTFE, TrueCrypt or even 7zip.
With this in mind, my solution is to use an unencrypted bootloader+kernel and a LUKS-encrypted filesystem (containing Debian testing) on an USB key that is at least 8GiB. The “stack” of the partitioning and file system is shown below.
The green part of the partitioning are the “secure” filesystems,
where you need a password to decrypt it. The red parts are unencrypted
zones where I should not put sensitive data (without some precautions).
The swap region must be kept in the encrypted side of the partitioning,
because you can’t know what is saved inside; even passwords can remain
written unencrypted after shutdown. Since the LUKS volume must contain
two partitions, LVM must be used to create them.
To create my USB key I have some options, for example:
- using debootstrap or using Debian CD installer
- using the USB key itself during installation or using an image file that I can copy to USB flash once it’s ready
- using QEMU or using a real PC
For simplicity, and taking into account the tools that I’m familiar
with, my choice is to use QEMU to install Debian from a CD image into a
raw hard disk image file which I then can copy (with dd) on the USB key.
To create a raw hard disk image I must know the exact size of data
that can be put inside the USB key, and create a file with the same size
(or less). For this step, I use “blockdev” to get the size, and use dd
to create a sparse file with the desired size.
As root, knowing that “sdc” is the block device corresponding to the USB key:
1 | # blockdev --getsize64 /dev/sdc |
2 | 8027897856 |
As normal user, I run dd using the found value minus one.
1 | $ dd if=/dev/zero of=usbkey.img bs=1 count=1 seek=8027897855 |
I then get the latest Debian testing ISO CD image, and run QEMU to install Linux on the raw hard disk image that I just created:
2 | $ qemu -m 512 -enable-kvm -hda usbkey.img -cdrom debian-testing-i386-netinst.iso |
I start the installation of LXDE desktop environment, because it’s
lightweight enough for many PCs and it doesn’t seem to write much on the
hard drive, and then get to the manual partitioning, which is the
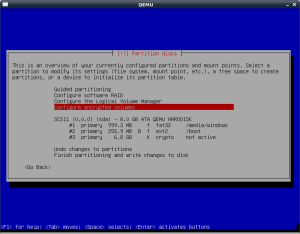
“hard” part of the installation. First, I create the physical
partitioning with the “windows” partition, the boot partition and the
crypto partition as shown in the screenshot (all are primary
partitions).
The “boot” partition has the boot flag enabled, and I set the ext2
filesystem to be mounted with noatime to reduce the number of writes.
You can also enable the “mount as read-only” setting, but then it
becomes difficult to upgrade the Linux kernel, the bootloader and the
RAM disk.
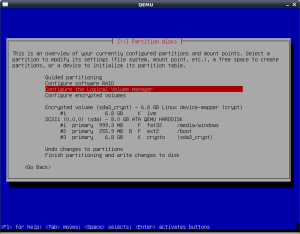
Then I create the LUKS encrypted volume on the “crypto” partition, by providing a password to unlock it.
Then I create the LUKS encrypted volume on the “crypto” partition, by providing a password to unlock it.
Then I setup LVM on top of it, with space for swap and root partitions.
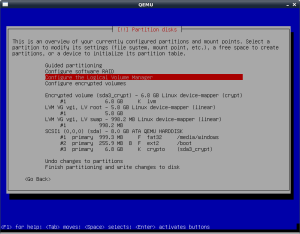
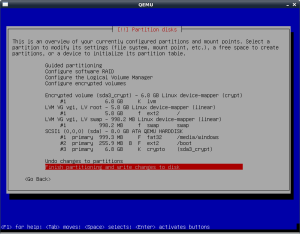
Then I assign the swap and root, setting ext2(noatime) as the
filesystem for the root partition. The final result is shown in the
following screenshot.
Note that I used ext2 because writing to flash is very time
consuming, and journaling file systems such as ext3 and ext4 do a lot of
writing on the disk, impacting performance and life of the USB key.
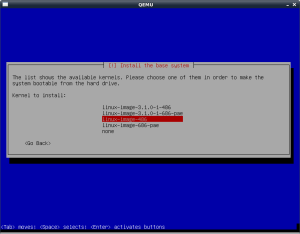
The installation goes on, installing a full Debian OS. At one point,
it asks what kernel I want to install, and I choose the “486″ version
over the “686-pae” version, because it is more likely to be compatible
with a generic PC.
When the installation is complete, I shut down the virtual PC and
close QEMU. Then I can copy the content of the raw image to the USB key,
by running as root:
1 | # dd if=usbkey.img of=/dev/sdc |
At the end of the process (it took my PC an hour to copy it), I have a
working USB key that contains an encrypted Debian OS that I can use
almost everywhere. I tested it on some PCs, an HP laptop, an IBM
Thinkpad, and it worked the same on all of them. Some considerations:
- add a line with “
vm.swappiness=10” in file “/etc/sysctl.conf” to avoid using the slow swap partition. - the execution is pretty fast because Linux does a lot of disk caching.
- sometimes on single-core PCs the CPU crunches at 100% and you can’t do anything, probably because it’s writing back the encrypted data on flash.
- on shutdown, Linux must write all the pending changes to flash, thus shutdown is not immediate.
- I must be very careful not to remove the USB key while it’s working. It can result in a corrupted filesystem or corrupted LUKS volume. The fact that ext2 is a non-journaling filesystem makes it worse.
- this solution is in some ways better than having an encrypted laptop with you:
it’s resilient toit protects against some “evil maid” attacks, an USB key is easier to take with you, and a laptop is “juicier” to steal.

No comments:
Post a Comment
Thank You , For Immediate Assistance Plz Put Email Copy to Deviceporting@gmail.com