Voice command image file and controlling electronics


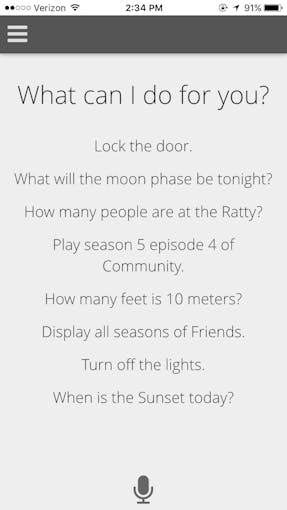
With the introduction of the Raspberry Pi B+, a lot of people 
are finding image files aren't working unless updated first. Because 
of this, I went ahead and made a fresh image file for voice command 
on Raspbian that is A/B/B+ compatible.

You can download it at:

https://mega.co.nz/#!MM8W1JxR!4PlZ_1-dumasDUCYRI4LuiBwEJgtqhfoin0R8ls90NQ

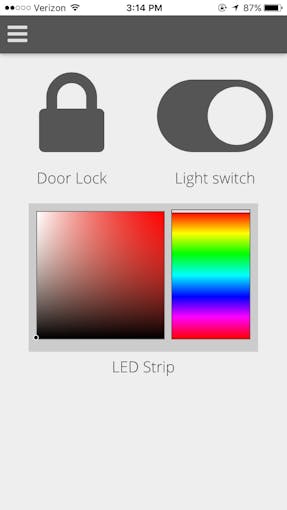
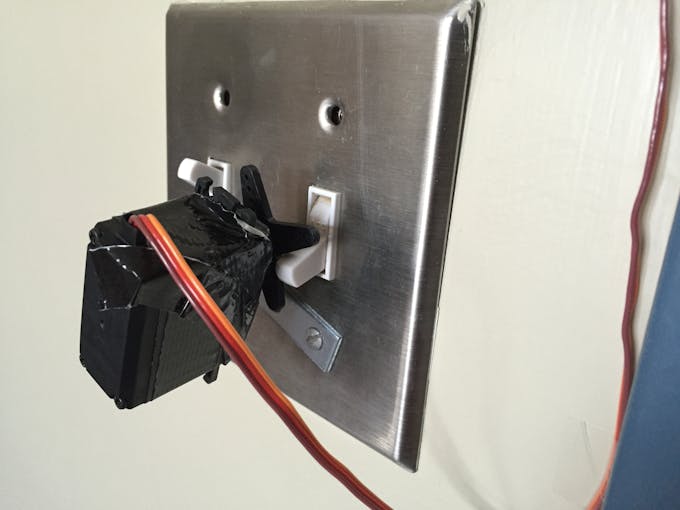
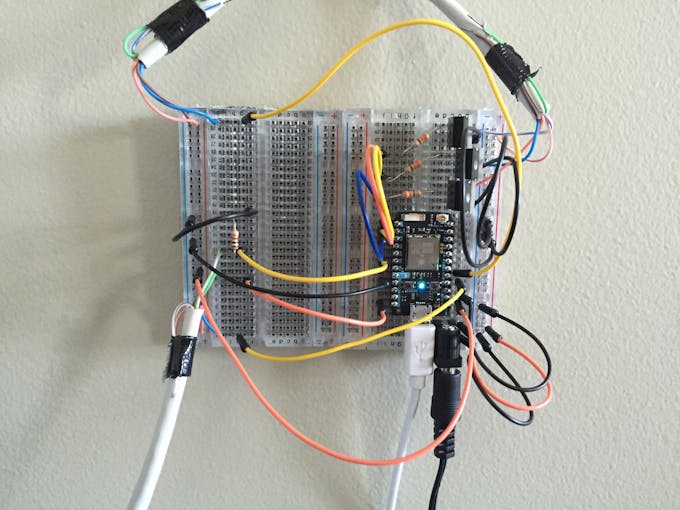
I've also taken the liberty of putting wiringPi and pilight on it. This means 
it's easier than ever to control electronics with your voice
 (I'll post more on that later).
You can read more about it at the hackaday projects page here.

And here is a quick video demo:

Low-cost Home Automation with Voice Control


STORY


Background

Today's home automation systems are expensive and often require the ability to install or modify existing hardware in the home. These two barriers to entry prohibit low-income individuals from joining the world of home automation.


My solution was to create an open source node.js server on a Raspberry Pi 2 running Windows 10 IoT Core for controlling preexisting hardware in the home without needing to make any permanent modifications. As a proof of concept, I have set up a basic home automation system in my dorm room using this node.js server.


RGB LED Strip Control

This circuit is used to control the RGB LED strip. The circuit uses N-channel MOSFETs to change the color pins of a 5050 Common anode LED strip (depicted by a single LED in the diagram). A 12v power supply is attached to the barrel connector. The resistors attached to the gate pins of the MOSFETs are 330Ω each.
Rgb%20strip
Door Lock
Download
A continuous rotation servo winds and unwinds a cable to move the door handle. To unlock the door, the servo winds the cable until a magnet on the door handle trips the reed switch (magnet sensor). To lock the door, the servo unwinds the cable for 2 seconds.
Door%20lock
Light Switch
Download
A generic servo motor that rotates to one angle for turning the light switch on and another angle for turning the light switch off.
Light%20switch

Photon code used to control the door lock, overhead lights, and the LED strip


C/C++
This code should be uploaded to your Photon board. It matches the pins from the circuits in the schematics section.
#include "rgb-controls/rgb-controls.h"
#include "SparkJson/SparkJson.h"
using namespace RGBControls;

Servo servo;
String method = "";
Color c1(0, 0, 0);
Color c2(0, 0, 0);
Led led(D0, D1, D2);
bool is_locked = true;
bool switch_on = true;

void setup() {
  RGB.brightness(16);
  Spark.function("method", color_method);
  Spark.function("lock", lock);
  Spark.function("switch", mainLight);
  Spark.variable("is_locked", &is_locked, BOOLEAN);
  Spark.variable("switch_on", &switch_on, BOOLEAN);
  
  pinMode(D5, INPUT);
  pinMode(D7, OUTPUT);
  pinMode(WKP, OUTPUT);
  pinMode(RX, OUTPUT);
}

void loop() {
    if (method.equals("fade")) {
        led.fade(c1, c2, 5000);
    }
    
    if (digitalRead(D5) == HIGH) {
        is_locked = false;
        delay(100);
        servo.detach();
    } else {
        is_locked = true;
    }
    digitalWrite(D7, digitalRead(D5));
}

int lock(String state) {
    if (state.equals("lock")) {
        if (!is_locked) {
            is_locked = true;
            servo.attach(RX);
            servo.write(150);
            delay(2000);
            servo.detach();
        }
        return 1;
    } else if (state.equals("unlock")) {
        servo.attach(RX);
        servo.write(30);
        return 0;
    } else {
        return -1;
    }
}

int mainLight(String state) {
    if(state.equals("on")) {
        servo.attach(WKP);
        servo.write(10);
        delay(1200);
        servo.detach();
        switch_on = true;
        return 1;
    } else if(state.equals("off")) {
        servo.attach(WKP);
        servo.write(70);
        delay(1200);
        servo.detach();
        switch_on = false;
        return 0;
    } else {
        return -1;
    }
}


int color_method(String command) {
    char json[100];
    command.toCharArray(json, 100);
    StaticJsonBuffer<512> jsonBuffer;
    JsonObject& root = jsonBuffer.parseObject(json);
    
    if (!root.success())
        return -1;
    
    method = root["method"];
    if (method.equals("fade")) {
        c1 = Color(root["c1"][0], root["c1"][1], root["c1"][2]);
        c2 = Color(root["c2"][0], root["c2"][1], root["c2"][2]);
    } else if (method.equals("set")) {
        c1 = Color(root["c1"][0], root["c1"][1], root["c1"][2]);
        led.setColor(c1);
    }
    
    return 0;
}
Home Automation Backend code
This is the repository for the node.js backend code that runs on the Raspberry Pi 2

michael-gillett / home_automation

5 3
No description — Read More
Latest commit to the master branch on 9-21-2015