Change IMEI In Android Phone

HUsing Mobile Uncle app or 

Now read full detail tutorial to change IMEI in Android phone using mobileuncle tool.it’s really so simple technique to change IMEI of any android phone.let’s see…
  • Download and install mobile uncle app on your android device. Now Mobile Uncle is not available on Google Play Store.[ mobile uncle app]
  • After successful installation of mobile uncle now open the Mobile Uncle.
  • Click on “Get Start” to run the app.
mobile uncle tool
  • If it’s your first time a Pop-Up will be open – requesting root permission then just grant the request and continue below…………..
  • Backup is important – create backup of original IMEI by “Choosing IMEI backup (MTK)” option.
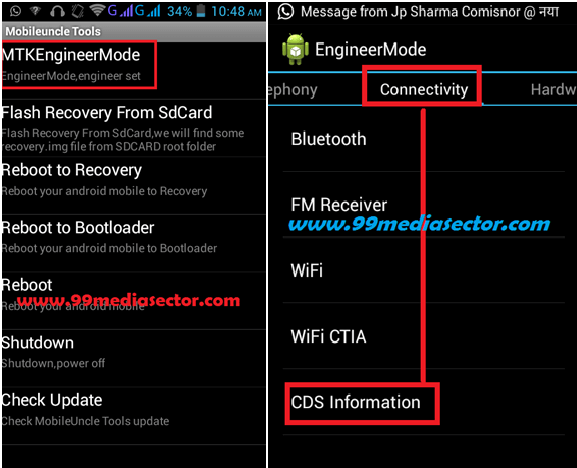
  • Now click on “MTK Engineer Mode” and slid your screen from right to left and select “CSD Information” under the connectivity tab.
changi imei using mobile uncle tool
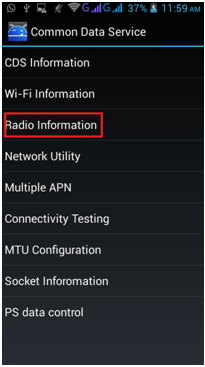
  • Now select the “Radio Information” option.
mobile uncle radio information
  • If you are using dual sim android phone then you can see “Phone 1” & “Phone 2”.
Here Phone 1 is SIM 1 and Phone 2 is SIM 2.so choose the option to change IMEI with BB IMEI.
changi imei
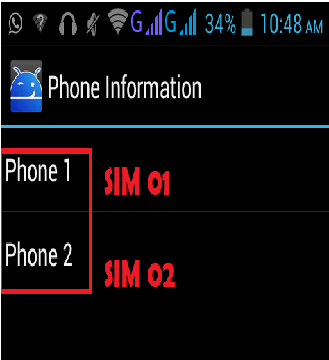
Here we are choosing PHONE 1 to tweak/change IMEI for example.
  • Click on PHONE 1 , Now you will see AT + on the top of screen.
changi android imei number
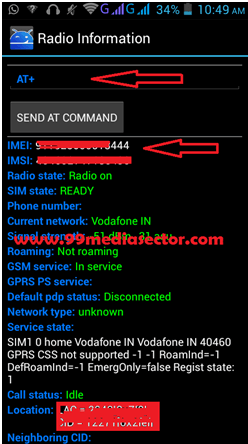
  • Now type E after AT+ and remove it again.
  • After clear it, a dialoug box will be open – select AT+EGMR=1,71,””””
changi android imei number (1)
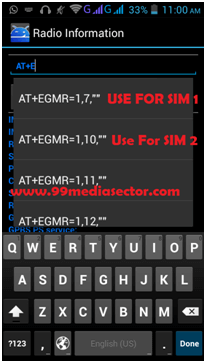
  • Now copy your BB IMEI (New IMEI) and paste it between [ ‘’ ‘’ ]
Ex- AT+EGMR=1,7,”xxxxxxxxxxxxxxx .replace the xxxxxxxxxxxxxxx with new IMEI.
If you are going to change IMEI second then use it as
AT+EGMR=1,10,”xxxxxxxxxxxxxxx
android imei changer
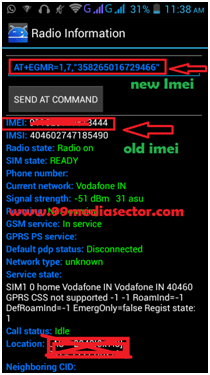
  • Make sure you had put right value now click on “SEND AT Command”.
  • Now a notification message will be appear in front of you ,saying AT command is Msend
  • Now same as you can change both IMEI number of android phone.
  • Now you are done.
Restart your android phone .now you will see you had changed IMEI in android phone. Check your android IMEI again by dialing *#06# and Enjoy your new IMEI number.
Trouble shooting
While changing the IMEI of android device if you got any error or getting any response like “command is not allowed in user build” after hitting on “SEND AT COMMAND” .don’t worry. Just add one space between AT+ and EGMR. it will like this AT+SPACE EGMR.
Now again click on “SEND AT Command”. That’s it.
Change IMEI Number Of Android Phone With Root Android Device
Remember this method will work if your android mobile or device is rooted. if your android device is not rooted then read out how to root android phone with PC or How to root android phone without PC .you can choose any one method according to you to root your android phone.
  • Before doing any changes in your android phone you must have backup of your IMEI number for the safety.
  • After successful root your android devices, now install Xposed installer on your phone. Learn how to install Xposed installer on android phone/device.
  • Ok now download and install the XPOSED IMEI Changer Module on your android device.(to change IMEI number of Android Phone)
  • Now in the next process enable this app in the Xposed Installer.
  • And then reboot your android device once again.
  • Now launch the app and you can see a IMEI screen changer option will be appear in front of you. type any desired value for New IMEI number that you want to assign your android phone/device.
1
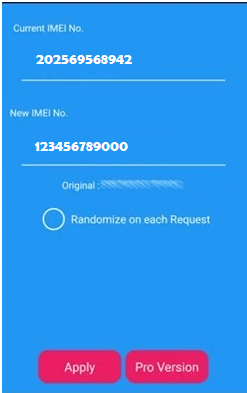
  • After valid input now click on Apply button.
  • Now you can see your new imei number that will be same as you assigned through the app in the starting.
As I told you above method01 will work only and only on MTK device .but method 02 will work on all type of MTK and non MTK android device but it required root access .so apply any above method according to you and change IMEI number of android phone easily.
This is all about how to change IMEI number of android phone/Smartphone .these are the best and working method to change IMEI number. Remember these changes will work only on android devices, so now you can change IMIE number of any android device.

Turn An Android Phone Into An Infotainment System

01
of 07

No infotainment system? Grab an old Android phone, and you're good to go.

the items you'll need for this project

If you have an old Android phone laying around, it's surprisingly easy to turn the device into a serviceable infotainment system. The end result won't exactly match the kind of functionality you get out of a fancy new OEM infotainment system, but you can make a pretty good stab at it without spending a lot of money.
The main features that you'll be able to add with this project include access to vital data from your vehicle's onboard computer and the ability to play music, video, and other content via your vehicle's sound system, and turn-by-turn navigation, just like a real infotainment system.
In order to complete this project, you will need:
  1. An old Android phone you aren't using anymore.
  2. Bluetooth or WiFi ELM 327 scan tool device.
  3. An FM modulator or transmitter, or a head unit that has an aux input.
  4. Some type of mount to hold your phone in place
  5. An OBD-II interface app
  6. Navigation and entertainment apps
Your results will vary depending on the type of Android phone you use, but this project was completed with an old G1. The G1, also known as the HTC Dream, is literally the oldest Android phone in existence, so just about any handset you have laying around should work. The phone in this tutorial is running custom firmware, however, so a G1 that has an outdated version of Android may not be able to run some of the latest diagnostic and entertainment software.
02
of 07

Locate the OBD-II connector in your vehicle.

an OBD-II connector

Unlike old OBD-I connectors, most OBD-II connectors are very easy to locate. The specifications state that the connector has to be within two feet of the steering wheel, so most of them are located in that vicinity.
The first place to look is under the dash to the left or right of the steering column. You may find the connector right up front, or it may be mounted back near the firewall.
If you have trouble locating your OBD-II connector right out in the open, you'll want to be on the lookout for removable panels. Some connectors are hidden behind removable panels under the dash or even in the center console. Your user’s manual will often show you where to look, or you can look for a picture on the Internet.
Some OBD-II connectors look a little different than others, but they all use the same pin-out. If you find a connector that is about the right size and shape, even if it looks a little different from the connector pictured here, it's probably what you're looking for.
If you gently insert your OBD-II wireless scan tool device, and it goes in, then you're on the right track. If it doesn't go in easily, however, you probably haven't actually located the OBD-II connector. The fit should be smooth and easy, and you should never have to force it. In some cases, the connector will come with a protective cover installed that you will have to remove first.
03
of 07

Plug in the OBD-II interface.

bluetooth OBD-II interface

04
of 07

Install the Android interface software.

G1 running Torque

Once you're all plugged in with your wireless OBD-II scan tool device, the first step toward really turning your Android phone into an infotainment system is finding the right apps, and the first one you'll need is an interface app.
There are a number of OBD-II interface apps available, so you should be able to find one that will work with your specific hardware and version of Android. Some are free, while others are quite expensive, and some paid apps also have free trial versions so you can get your feet wet before you spend anything. Torque is a popular option that offers a free “lite” version that’s useful for just testing your system.
You may also want to try out a free version first to make sure that the app will run on your phone and connect to your ELM 327 device. Even if the Google Play store says that an app will run on your phone, you may find that it refuses to pair with your scan tool.
05
of 07

Pair your Android and ELM 327 scanner.

android wireless settings

If you’re using a Bluetooth interface device, you’ll have to pair it with your phone. Pairing sometimes fails, which typically indicates an issue with the interface device. In that case, you may have to obtain a new unit.
Once your Android is paired to your scanner, you'll be able to access all sorts of important information from your vehicle's onboard computer. It isn't exactly the same as the types of monitors often included in infotainment systems, but it's a close approximation that you can get working on virtually any vehicle built after 1996.
06
of 07

Set up your FM transmitter or auxiliary cable.

An FM transmitter plugged into an Android phone

Once you have the information part down, it's time to move on to the entertainment.
If your head unit has an auxiliary input, then you can use your Android phone to play music through that interface. However, it’s also possible to do the same thing with an inexpensive FM transmitter or an FM modulator. You can also use a USB connection if your head unit has one.
The sound quality can vary from mediocre to great, depending on the connection method you use, but either way, you’ll have access to your music library or Internet radio apps.
In this case, we have hooked up the G1 to an FM transmitter and tuned the radio to an unused part of the broadcast spectrum. This allows the phone to transmit music, or anything else, over the vehicle's speakers.
Many Bluetooth car kits achieve this same basic type of functionality, and you may be able to use your Android phone for hands-free calling if it still has an active voice plan.
07
of 07

Install other infotainment apps.

G1 Infotainment Device

After you're up and running with your OBD-II interface app and have your old Android phone connected to your car audio system via an aux input, FM transmitter, or other means, you're good to go. You'll already have the basics of a do it yourself Android infotainment system going on, but there's no reason to stop there.
If you have an active data connection on your phone, or a mobile hostpot, you can turn it into a true infotainment system that can monitor your vehicle through the OBD-II interface, play music, provide GPS navigation with turn by turn directions, and virtually endless other functionality through other apps.

Turn Your Old Android Phone/Tablet into the Ultimate Car GPS